

Winning
Winning happens after 9 or 18 holes, depending on what was decided beforehand. Add up each Golfer's score: fewest total strokes wins!
Get to know your Disc Cards
Each card has a Disc side and a Location side. When each Disc Card is made it is randomly put together from the current pool of all Discs and Locations. You may never find two identical Disc Cards!
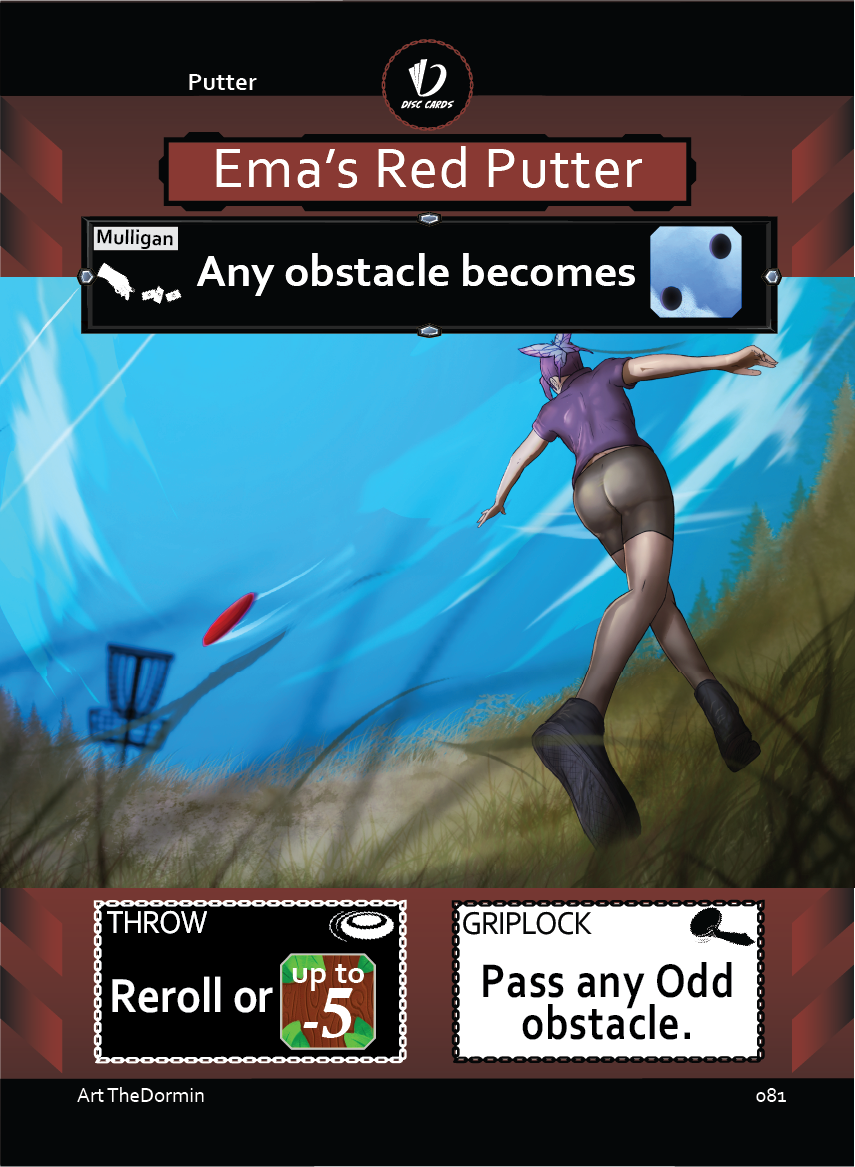
Each Disc side has abilities you'll use during your throws and abilities you’ll use during your opponent’s Throws.
Ema’s Red Putter has a MULLIGAN ability, a THROW ability, and a GRIPLOCK ability.
Discard abilities (top of the Disc): You may discard from hand to use on another player's throw — to help or hinder them. The thrower may respond by using their own discard ability!
THROW abilities are used during your throw when the Disc is in your Bag. Turn the Disc over to activate. You can use it again next turn.
GRIPLOCK abilities are used during your throw when the Disc is in your Bag. Discard to your discard pile to activate.
Steps of the Turn
1. Retrieve — All Discs are turned Disc-Side-Up. Any Discs in the "Off Hand" slot are discarded.
2. Card — The Golfer with Honors shuffles and cuts their Deck to reveal the next Hole, which is placed in the center of the table. Golfers draw/discard to six cards in hand.
3. Arrange — Golfers can, in any order, do any of these any number of times: Discard a Disc from your Bag; Move a Disc in your Bag to a different slot; Place a Disc from your Hand into your Bag; Place any card from your Hand into the Off Hand slot.
4. Route — Each Golfer chooses their Route. To try the Birdie or Ace Route, discs of that Route's color must dominate the Discs in your Bag — you need a plurality (more than any other color) of that color. The Par Route is always available. Once you start your Route you must finish it.
5. Throw — Each Route has a score: 1 for Ace, 2 for Birdie, 3 for Par. Roll a number of dice matching the score of your Route. Choose one of these dice and try to match the number on the first obstacle of your Route.
Example: you're on the Par route, facing "Wood: Any Odd," then "Air: Five," then "Stone: Two." You roll three dice and pick a Natural Five — a Natural roll matches any type of obstacle, so it matches the first two obstacles all by itself! Once a match is made, you must continue to use that die to finish the Route. Now use a Griplock ability (discard a Disc: "+1 or −3") to change your "Natural: Five" into a "Stone: Two." Route done!
Match each Obstacle on your Route, using your Discs' abilities to change your Throw to match each Obstacle's type and value.
Making matches — Only Natural rolls, or Natural rolls using Natural abilities (like the Griplock ability "Change up to ±3"), may be used to match a Natural obstacle. For the three other obstacle types (Wood, Air, or Stone), the last ability type used is the one that counts for the match.
Rerolls — You may use the "Reroll" ability to pick up your rolled dice and roll them again, until you make your first match. Rerolls are treated as if the first roll(s) never happened.
Scrambling — Scrambling is what happens when things go wrong. Call "Scrambling" when you are out of options. Your Discs in hand, deck, and bag become the currency you'll spend to match your remaining obstacles. Each unmatched obstacle when you start Scrambling adds a stroke to your Route's score value. (Example: a failed Ace Route with five total obstacles and only one matched means at least a "5" this hole: Ace Route 1 + 4 remaining unmatched obstacles = score 5.)
Start Scrambling by rolling one die. All Discs in your deck, bag, and hand lose all abilities but gain this text: "Discard this Disc from your Bag: ±1. If you have no Discs in your Bag, discard this Disc from hand instead. If you have no Discs in hand, discard this Disc from the top of your Deck instead. Discard a Disc for each time you have used this ability on this Hole." Maneuver your Scramble roll to match your remaining obstacles, in order, from left to right. Next hole your Discs all go back to normal.
6. Score — Record each score on the scorecard. Golfers earn the score for the Route they completed, unless they had to Scramble. Add any Penalty Strokes. The Golfer with the lowest score has Honors for the next hole. Each Golfer may elect to discard all Discs in bag and hand to do a fresh Bag setup.
Penalty Strokes happen when you run out of cards in your Deck. Roll a die: 1–3 = 1 stroke, 4–6 = 2 strokes. Add this number to your next score. Shuffle your discard pile to make your new deck and continue drawing cards.
Effects & Abilities only last for the current hole unless the card states otherwise.
Getting Ready (Bag Setup)
Decks are exactly 54 cards. You may have no more than THREE of any one Disc in your Deck. There is no limit on the Location sides — play the same hole over and over if you want.
Shuffle your Deck, place it on the table, Location-Side-Up.
Draw 12 cards, then place SIX Discs face up in front of you: 3 Drivers, 2 Midranges, & 1 Putter.
Some Discs may fit into more than one category. Try to keep your Bag as full as possible!
"Off Hand" is a 7th spot in your Bag. It may fit any type of Disc, but it is always discarded at the beginning of each turn. You may place any Disc in the "Off Hand" slot now.
Decide Honors by rolling a six-sided die. High number begins the game with Honors.
Golfers now start the "Steps of the Turn."
Locations & Routes
Each Location card shows a real disc golf hole — for example, Oakwood Park DGC in Delafield, Wisconsin (Basket 2 • Par 3). Each Location has three Routes:
Par (gray) — gives a score no lower than a "3"
Birdie (purple) — gives a score no lower than a "2"
Ace (orange) — gives a score no lower than a "1"
You roll the dice and use your Discs to match the Obstacles on your Route, in order from left to right.